Masthead header

Easy Photo Tip: Catchlights

Here’s a quick photo tip for you that will instantly improve your portrait photography: When taking a portrait, try to get catchlights in the subject’s eyes.  A catch light is a highlight seen in the eyes from the light source you are using.  They add sparkle and dimension to the eyes.

Catchlights vary in size and placement in the eyes depending on, well, the size and placement of the light source.  Even if the main light source is behind your subject, you can still get a catchlight in the eyes by using a reflector. There’s no right or wrong size and placement to a catchlight, it’s simply a matter of personal preference (You know, art is subjective, man.  Can ya dig?)

Untitled design
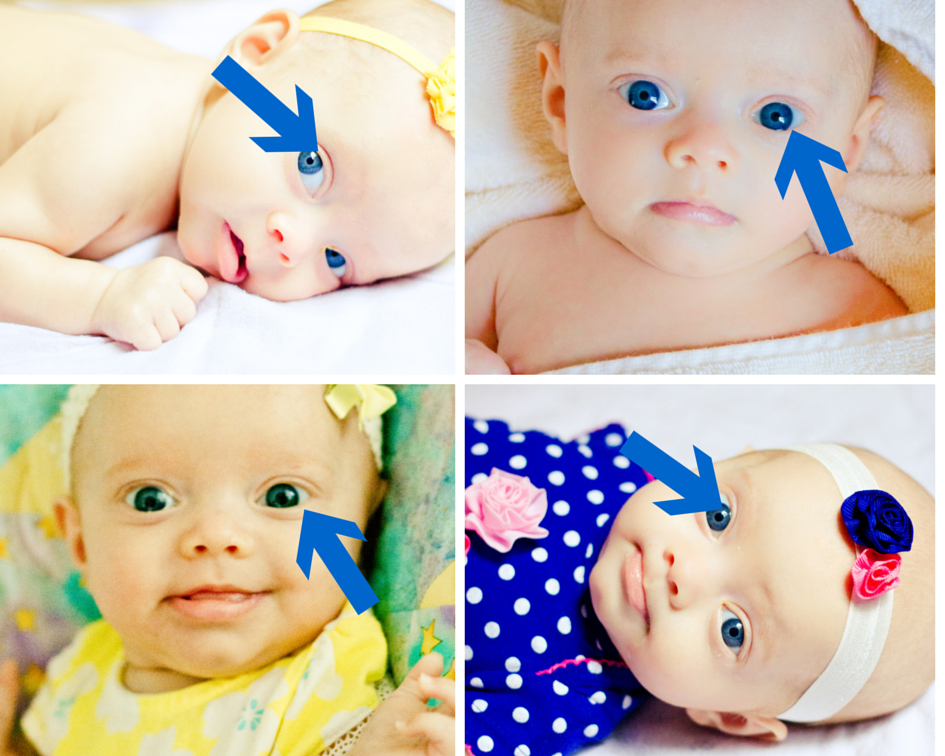
Above: where the catchlight is in the eye depends on where the light is coming from in the photo. 

Share on FacebookTweet this PostPin Images to PinterestBack to Top

Free Ebook! How to Turn your Home into Your Own Photo Studio!

Free Ebook

Here’s what professional photographers don’t want you to know: Anyone is capable of taking frame-worthy photos right in your own home!

This FREE ebook will teach you how to do just that.

PLUS it will teach you how to photograph your children at any age, specific ideas for creating unique images, and tips for capturing special moments.  In case you’re worried, you do NOT have to own a DSLR; there are tips to help you take better photos with your good old camera phone! You are going to LOVE it! But you don’t have to take my word for it! Here’s what others have said about this free PDF:

“I truly loved the whole thing. It’s so amazing!” -J.K.

” I LOVE this! I really think a lot of people would benefit from it. This was super helpful for me because I have dslr camera but don’t know how to use it very well, but I love taking pictures of my daughter. You gave great tips that can apply to anyone! Visually, it’s amazing as well!”  – A.L.

“This manual is fantastic!  It made me want to get up and go photograph my kids!” – E.W.

“I loved how it’s explained in simple terms.  It grabbed my attention and helped me understand clearly. I also loved all the different ideas!! My mind is racing with creativity now!” -M.W.

What do ya think? Worth the free download?  This baby won’t be free forever.  I’m simply celebrating the launch of the new phase of my business by spreading photography goodness wherever I can, so grab it while the grabbing’s good! Here’s the link: http://rachel-mchardy-photography-elibrary.myshopify.com/collections/frontpage/products/capture-my-world-turn-your-home-into-a-personal-photography-studio

Here’s the PROMO CODE: cmwfree

Now go get your photography on!

Free photography ebook how to

Share on FacebookTweet this PostPin Images to PinterestBack to Top

Why Printing an 8×10 May Result in Loss of Limb

Today, we are all about aspect ratios in photography.  Yes, ratios as in math ratios.  Yes, ratios as in a quick trip back to 5th grade math.  Let’s break it down:

The aspect ratio in photography is the relationship (ratio) of width and height of an image.  It’s expressed like this- width:height. 35mm cameras and dSLRs have an aspect ratio of 3:2, meaning the width is 1.5 times the height.  If you are shooting “portrait” or vertical, that switches to 2:3 because when you shoot that way, your image becomes taller than it is wide.

So what does that have to do with cropping? Well, in short, it explains why when you order an 8×10 you might notice you’ve accidentally cropped someone’s head and/or feet.   Here’s where the math comes in.  The corresponding print for a 3:2 aspect ratio is a 4×6 print (or think of it as a 6×4, if you want to keep it width to height).  We know that because two goes into six 3 times and two goes into four 2 times (6/4 reduces to 3/2).

Now, what happens when you want, say, an 8×10 print.  Well, if you didn’t crop it wide enough, you just might chop off part of someone’s head or feet.  You see, an 8×10 (or 10×8 if that makes it easier) has a 5:4 ratio (10/8 reduces to 5/4).  Which means we’re no longer working with our standard aspect ratio.   We are now working with a more narrow ratio.  What this means for your print is that you are going to LOSE part of your image if you print an 8×10.  Let’s take a look at this in images.

understanding crop ratiosAbove: Image as shot.  A close crop to begin with. 

understanding crop ratios

Above: cropped to an 8×10 (5:4 ratio).  Notice how much is lost on the top and bottom. 

Look at the photo above.  What an awkward crop we have going on at an 8×10! We’re missing all of her feet and part of her head.  If we stick that in a frame, it’s going to look even more truncated. So what is to be done? Well, there are all kinds of creative options.  However, I’m going to stick to the simple ones.  Here are a few simple suggestions:

1. Shoot loose- in other words, when taking a shot, anticipate that you might want to turn it into an 8×10 (or another print size with a 5:4 ratio) and leave some extra room along the edges.

2.  Avoid cropping as much as possible during post-processing-  leave as much real estate space as you can.

3.  Stay away from printing the 5:4 ratio all together- opt instead for something with a 3:2 ratio. (See chart below.)

So what did we learn? Any print size that doesn’t follow a 3:2 (or 2:3) ratio is going to result in clipping.  Keeping this in mind when you shoot will save you the headache of a bad print later!


Aspect Ratio:  1:1 6:5 5:4     7:5   3:2 2:1

Print size (in inches):

5×5

20×24

4×5

11×14

10×13

2.5×3.5

3.5×5

4×6

10×20
  8×8   8×10     5×7   12×18  
  10×10   16×20         16×24  
  12×12             20×30  
  20×20             24×36  


Share on FacebookTweet this PostPin Images to PinterestBack to Top

Freebie Friday: Free Fall Printable

I know I’ve been MIA for a long, long time.  I’m actually really excited to share the reason why! I’ll be dishing about what’s to come for Rachel McHardy Photography this next week.  Trust me, you’re going to love it!

To make up for my absence, and let you know I’m still around, I’ve created this FREE fall printable.  It prints at an 8×10 photo size.  Just take the jpg to your favorite printer, and you’re good to go!

The weather here in The Dalles has finally cooled off.  This week has actually been the perfect October week- a little rainy, a little misty, nice and cool.  I hope you’re all enjoying your fall wherever you may be!

free fall printable

Get the printable below!

Free fall printable

Share on FacebookTweet this PostPin Images to PinterestBack to Top

Post ALL the Things???

Family photo

I haven’t posted in a while.  One day, about a month ago, I got super blog happy and was like, “post ALL the things!” But then I went to pull up my website and it big, fat wasn’t there.  I kept getting this annoying “Oops!” page that basically told me the page I wanted was currently lost and alone in a dark alley in cyber space.  So I contacted my hosting company.  They told me I needed to contact my domain registrar.  The domain people told me the problem was with the hosting company.  The hosting company was like, “nah-uh” and the domain people were like “yeah-huh.”

Eventually, I figured it out and got the website up and running, but by then I was so annoyed with both companies that I had removed myself from their automatic renewal lists. (Yeah, I know how to stick it to ’em!) Now I can’t remember which company was right and which was wrong, nor can I remember my login to either.  So there’s a good chance this website will simply cease to exist sometime in July.  That’ll be fun to fix.  But seeing as how not even my own mother reads this blog, I highly doubt the hiccup will even be noticed.

Anyhoot, by the time I got the website back up, the wind was out of my writing sails and I was like, “post ALL the things?” So I put it off.  It was easy because there are boxes to pack (we’re moving to Oregon, you know), dinners to make, diapers to change, walks to take, etc.  Finally, I gave myself 2 choices: 1. I could either write a blog post or 2. Organize Lightroom.  My Lightroom catalog is in such disarray, it would scare the lens cap off any other photographer.  Rather than do something about it, I’m pretending it’s not an issue and doing something else.

Well, that’s really it.  I just wanted to say hey, how’s it going? Oh! And here’s a photo tip: invest in a tripod.  That made the picture above possible.  It’s good to be in a picture myself every now and then.

Share on FacebookTweet this PostPin Images to PinterestBack to Top